
How to Install Cable Rail Tensioners in Metal Posts
Installing Cables Demo Video
Watch this section of the Signature Series side mount installation video on how to install cables with tensioner kits for metal posts. Tensioners can be threaded into Signature Series aluminum posts by hand.
How difficult is this project?
This project is: DIY-FRIENDLY
Installing tensioners in Cable Bullet Signature Series posts, or custom fabricated metal posts is a simple, straightforward process. The same tensioning hardware can be used on straight, angled, or sloped railing sections.

Whether you're using Cable Bullet Signature Series posts or working with a fabricator on a custom solution for your project, nothing says modern elegance quite like aluminum or steel railing. Cable Bullet metal post tensioners feature a finer machine thread ideal for attaching to steel or aluminum post walls.
Continue reading or download the installation instructions:
Working with custom metal posts?
Cable Bullet tensioners can be used for cable infill with aluminum, steel, or stainless custom metal railing. To make sure your rail design is compatible with our tensioners, follow these specifications:
- USE 2X2-INCH TUBING (minimum) for strength, and to allow space for two sets of tensioners on opposing or perpendicular sides.
- STEEL POSTS should have a wall thickness of no less than 3/16”. Drill a 19/32” pilot hole and tap for 5/8-18 threading.
- ALUMINUM POSTS should have a wall thickness of no less than 1/4”. Drill a 37/64” pilot hole and tap for 5/8-18 threading.
Materials List
Supplies:
- Metal tensioner kits
- 5/32" diameter cable
- Boeshield T-9® stainless steel lubricant
- Cable spacer bar kits (optional)
- Shop rags
- 3/4" painter's tape (optional)
Tools:
- Cable Bullet installation kit for metal posts
- Socket wrench with 7/16” head
- Hex socket power bit (optional)
Installation Instructions
PLEASE NOTE: All Cable Bullet recommendations and rail components are designed to comply with the International Residential Code (IRC). However, because building codes may vary it is the installer's responsibility to verify that the installed system, complies with all applicable state and local building codes. For more information on Cable Bullet and building code standards, visit our terms page.
1 | Set Tensioners
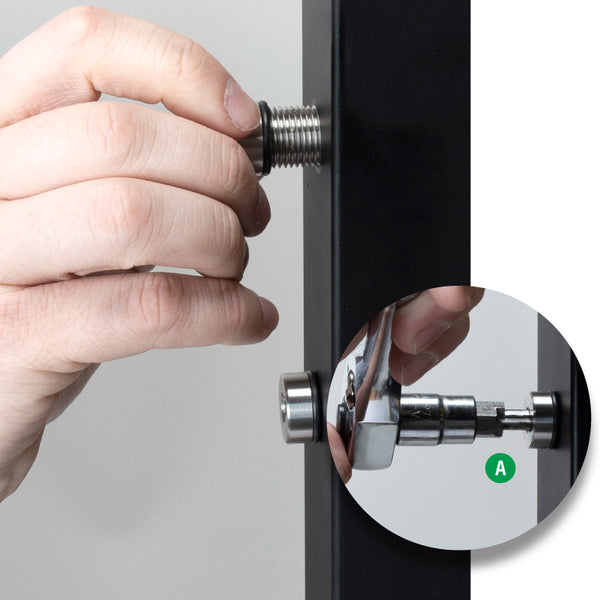
Thread the tensioners into the post and use the Bullet driver A and a socket wrench with a 7/16” socket to align the tensioners so the set screw is accessible relative to the angle of the cable.
2 | Lubricate Tensioners

Apply a drop of Boeshield T-9 lubricant to the set screw channel of each tensioner to ease installation and reduce the likelihood of seizing, passivate the stainless, and help prevent corrosion.
3 | Fix Spacer Bars (optional)
![]()
Fixed spacer bars attach to the top rail using a standoff. Use a #25 drill bit for the pilot hole, and tap for 10-24 NC. Use a drill to set the standoff, then thread the spacer bar onto the standoff.
PRO TIP: Protect the finish and threads on your standoff during installation with a piece of painter's tape.
4 | Cut Rough Cable Lengths

Measure your runs and cut oversized, rough lengths of cable for each. Leave an extra few inches so as not to end up short. You will make a finish cut later.
5 | Crimp Cable Ends

Fit the first end of your cable with a lobed washer and crimp sleeve. Use the Cut & Crimp Multi-Tool to firmly set the crimp. Each sleeve will receive 2 crimps, one at each end.
CAUTION: A properly crimped cable end is essential to maintaining the integrity and safety of your cable. A weak connection will slip over time and fail against an impact load.
6 | Set Cable Ends

Insert the crimped cable and lobed washer into the tensioner and use a 3/32” Allen key or hex socket power bit to advance the set screw until it is flush with the face of the tensioner.
CAUTION: To minimize the risk of cross-threading or galling, use a manual socket driver or Allen wrench.
7 | Run Cables

With the crimped end locked in place, thread your cable through all the intermediate posts and spacer bars
PRO TIP: Tape your floating spacer bars to the closest post until all your cables are set.
8 | Cut Exact Cable Lengths

Pull the cable hand-tight, measure an inch past the face of the tensioner, and make your finish cut.
PRO TIP: Use 3/4" painters tape to easily measure 1" past the face of the tensioner (1/4" tensioner head + 3/4" painters tape.)
Repeat steps #5 and #6 to secure the second end of your cable, then repeat the entire process for each of your cables.
9 | Final Tensioning

Once all your cables are in place, begin tensioning each run from the innermost cable outwards.
How tight is tight enough?
Take care not to over-tighten the cables. A properly tensioned cable will deflect approximately 1/4” per foot under a 50lb load.
10 | Set Spacer Bars
![]()
Position and lock any floating cable spacer bars in place by advancing the set screw top and bottom.
Care & Maintenance
After you’ve finished the installation process, follow the Cable Bullet Care & Maintenance Instructions to make sure your cable railing looks great for years to come!